Friday, May 15, 2015

BLUEBERRY POPSICLE


The weather is getting warm here in Las Vegas which is perfect timing for these healthy popsicles.  I remember eating a ton of store brought popsicles in the summertime as a child. They were sweet and refreshing, the perfect combo for children. Now, I look at those products as if they were evil, given their processed sugars, artificial flavors, and questionable ingredients.

Knowing what is in my food is so important to me, and since I do have an a weakness for popsicles, I decided to make my own version.  Not only do they taste really yummy, but I can eat them feeling good about whats inside of them.  Now, if you like your popsicles sweeter, be my guest and add more natural sweeteners.  Or if you want less, just omit it. That's the beauty of making our own food... we can adjust it to our liking.

I used my own cashew milk which is vanilla favored, and slightly sweetened already.  You can make these with any non-dairy milk, but I would recommend a vanilla flavored one. Otherwise, add 2 teaspoons of vanilla essence to the mixture to give it the flavor. 
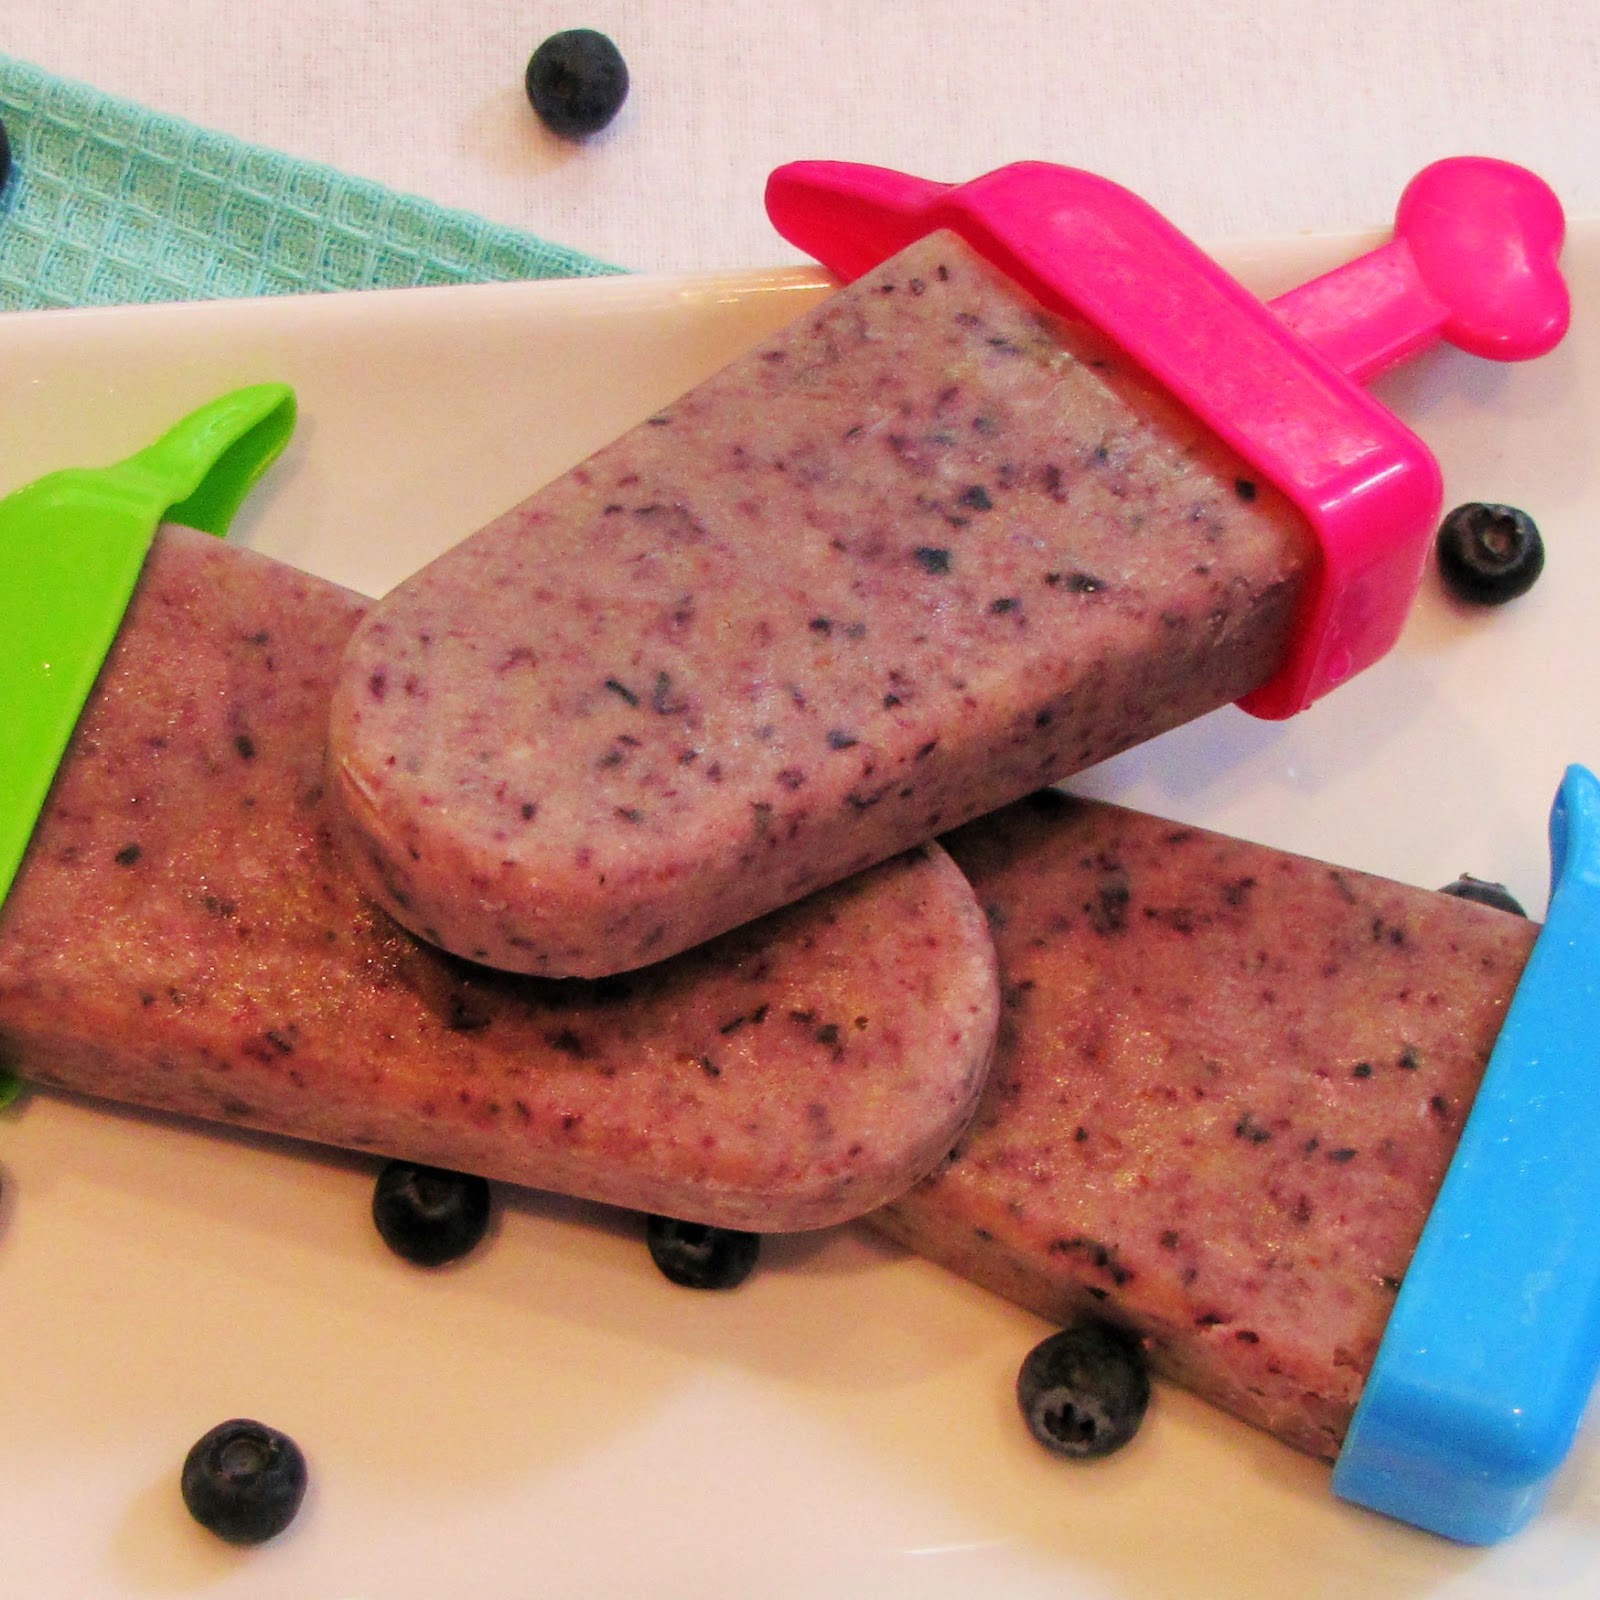


BLUEBERRY POPSICLES


Ingredients:


  • 2 cups of vanilla flavored non-dairy milk (I used my own vanilla cashew milk)
  • 2 cups of blueberries
  • 1 ripe banana
  • 2 tablespoons of agave nectar (or liquid sweetener of your choice)
  • 2 tablespoons of coconut oil


Preparation:


  1. In a blender quickly blend the ingredients, until mostly smooth, but leaving a few chunks of blueberries.
  2. Transfer the mixture into popsicle molds, and place in the freezer until completely frozen, 6 hours to overnight. 
  3. When ready to eat, run the popsicle molds under warm water for easy removal.


Enjoy!


Depending on your mold size the amount of popsicles will vary. I yielded 10 with mine.


Thursday, May 14, 2015

STRAWBERRIES AND CREAM STEEL CUT OATMEAL


I used to skip breakfast as I was not hungry in the morning. Back then, I was quite pleased with a coffee in my hand, and it would actually take me quite a while to feel awake. Mornings were just not my thing. Now, I love being up early, I barely ever have coffee, and breakfast is one of my favorite meals.  It's quite funny how we change through the years. I seriously now love breakfast so much that I sometimes have breakfast food for dinner.  Just yesterday, my dinner consisted of a bowl of cereal with homemade cashew milk and berry toppings, and some leftover stuffed peppers. I know, weird combo, but that's what I felt like eating.

One of the thing that I like to eat in the morning is oatmeal.  Not only do I find it delicious, it is also very wholesome. Here are some of the benefits of eating oatmeal:
  • Reduces the risk of high blood pressure
  • Lowers cholesterol
  • Stabilizes blood sugars because it's high fiber content
  • They are full of antioxidants
  • One of it's fibers, he beta-glucan fibers, helps boost the immune system
  • Help maintain a healthy weight by keeping you full longer

Oatmeal is very filling. The density of it keeps me full for quite a while, and they are super versatile and tasty.  You can make so many things with oatmeal: cookies, muffins, hot oatmeal, overnight oats, baked oatmeal, and yes... pancakes (of course the recipe of that one is coming soon!), Adding to that list that they are super nutritious, and it becomes one of my breakfasts of choice!  Today we are having more of a traditional steel cut warm oatmeal, but do not be fooled to think it will be boring as I made it a lot more exciting with strawberries, strawberry puree and a homemade sweet cashew whipped cream. It really was divine! 

Just so you know.. Oatmeal is a whole grain, and naturally gluten free, but it  gets easily contaminated from food facilities that contain wheat products. So if you are avoiding gluten, look for the gluten free labels. :)

This breakfast is pretty decadent. For a healthier version, just skip the whipped topping.


STRAWBERRIES AND CREAM STEEL CUT OATMEAL


Ingredients:


For the oatmeal:

1 cup of steel cut oatmeal
2 cups of water
2 cups of non-dairy vanilla milk (I used homemade vanilla cashew milk)
1/2 cup of strawberry puree (recipe below)
2 tablespoon of chia seeds

For the strawberry puree:

20-25 medium sized strawberries, chopped (3 cups)
2 teaspoons of coconut nectar (or any liquid sweetener of your choice)

For the topping;

8 strawberries, sliced
1 cup of strawberry puree (see recipe below)
1/4 cup of unsweetened coconut flakes
1 cup of  non dairy whipped cream of your choice (I used coconut whipped cream)  


Preparation:

Make the strawberry puree by putting the strawberries and the coconut nectar in a blender, and puree until smooth. This should give you about 2 cup of puree. 
In a small saucepan, bring the oatmeal, water, milk, and 1 cup of the strawberry puree to a boil under medium high heat. Stir often.
Reduce the heat to minimum, cover, and let it simmer for about 15 minutes.
Add the chia seeds, stir, and continue to simmer, covered for another 5 minutes until most of the liquid is absorbed, and the oatmeal is creamy and tender.
Split the oatmeal mixture into 4 separate serving bowls.
Top evenly with the remaining strawberry puree, the strawberry slices, the coconut flakes, and a dollop of the whipped cream.

Enjoy!


This will make 4 servings


Wednesday, May 13, 2015

HOW TO MAKE NON-DAIRY WHIPPED TOPPINGS


Non-dairy whipped toppings? Yes please! These two flavors are good enough to bring any whipped cream lover into a heavenly state. They are perfect to use for special occasions, on top of fruits, or on a delightful dessert to impress friends. 

The sweet cashew whipped topping is to die for! The color is a little bit of a light caramel, due to the dates in the recipe.  However the flavors and textures are so rich.

It definitely is on the sweet side because it is comprised of mostly dates and cashews, yet it is also full of nutrients. Sweet food that nourishes the body... Now that's what I like to get if I am going to indulge!  Serve it as a replacement for your dairy whipped cream recipes, or simply on top of fruits.


The coconut whipped cream is very similar to a regular dairy whipped topping, as the texture is very fluffy. You could use a coconut milk can instead of cream (make sure to use the full fat ones).  But you will not yield as much as the coconut cream, so you will need to adjust the sweetener and the vanilla quantities. Plus, a lot of the coconut milk companies use guar gum as an ingredient, which emulsifies the cream and the water.  Thus the cream does not separate, and it doesn't work. I have personally have had much better results with coconut cream. You can find coconut cream at Trader Joe's, online, or in your local Asian market. Trader Joe's brand works really well.


These are super easy to make.  The hardest part is deciding on which one to satisfy your sweet tooth! 


HOW TO MAKE NON-DAIRY WHIPPED TOPPINGS


Ingredients:


For the sweet cashew whipped topping:


  • 1 1/2 cups of raw cashews, ideally soaked in water for 2 hours to overnight
  • 3/4 cup of water
  • 6 dates, pitted, (if they are hard, soak them in warm water for 30 minutes)
  • 1 tablespoon of coconut oil
  • 2 teaspoons of vanilla essence
  • 1/2 teaspoon of cinnamon


For the coconut whipped cream


  • 1 can (14 OZ) of coconut cream, refrigerated overnight
  • 2 tablespoons of coconut nectar (or liquid sweetener of your choice)
  • 1 teaspoon of vanilla essence


Preparation: 


For the cashew whipped topping: 


  1. In a high speed blender, blend all of the ingredients together until extremely smooth
  2. Keep refrigerated for up to 6 days..


For the coconut whipped cream;


  1. Chill your coconut cream in the fridge overnight
  2. Remove the can from the fridge without shaking, and remove the lid.  The fat and the liquid will have separated, leaving a nice thick cream on top.
  3. Scoop out the top, thick cream, leaving the liquids (if any) at the bottom
  4. Place the cream in a mixing bowl, (you might want to chill the bowl in the freezer for 10 minutes prior to using it if you live in a warm climate)
  5. Add the coconut nectar and the vanilla essence to the bowl, and beat with a mixer for about a minute until creamy and smooth. 
  6. Use immediately or refrigerate for up to a week for later use.


Enjoy!


These recipes will make:

1 1/4 cups of sweet cashew whipped topping

1 1/2 cups coconut whipped cream


Sunday, May 10, 2015

STUFFED BAKED SWEET POTATO WITH SPICED BLACK BEANS AND CHIPOTLE-AVOCADO CREMA TOPPING


I have been wanting to create something with stuffed sweet potatoes for quite a while now, and oh boy... do I wish I had done it sooner!  This creation was sooo heavenly! In fact, my daughter has put this dish as one of her all time favorites. 

This recipe has a little kick to it, so if spicy is not your thing, lower the amount of jalapeno, cumin, and chipotle powder by half.  We are spice lovers in this household, so a lot of my recipes are on the slightly fiery side. This dish can be an appetizer on it's own, or a main course if served with a nice salad, quinoa, or rice. Either way, you will be glad you made it!


STUFFED BAKED SWEET POTATO WITH SPICED BLACK BEANS AND CHIPOTLE AVOCADO CREMA TOPPING


Ingredients:


For the stuffed potatoes:
  • 1 tablespoon of olive oil
  • 4 medium sized sweet potatoes (yams)
  • 1 onion, chopped
  • 2 garlic cloves, chopped
  • 1 green pepper, seeded and diced
  • 1 tomato, diced
  • 1 jalapeno, seeded and chopped small
  • 1 1/2 cups of cooked black beans (about 2/3 cup of dried beans. Click here to learn how to cook beans)
  • 1 1/2 teaspoons of cumin powder
  • Sea salt and pepper to taste

For the chipotle-avocado crema:
  • 1 ripe avocado, pitted and skin removed
  • 2 tablespoons of fresh lime juice
  • 1/4 cup of water
  • 1/2 teaspoon of chipotle powder
  • Sea salt and pepper to taste


Preparation:


For the sweet potatoes:

  1. Preheat your oven to 400 F 
  2. Pierce each sweet potato with a fork several times
  3. Place the sweet potatoes on a baking sheet lined with foil
  4. Bake until tender about 45 minutes
  5. Remove from the oven

For the spiced black beans:

  1. In a large saute pan, heat up the olive oil under medium heat
  2. Add the onions and garlic, and saute 3-4 minutes until the onions are translucent
  3. Add the green pepper, the jalapeno, and the tomato, and cook for about 10 minutes until the peppers are softened
  4. Add the black beans, cumin powder, salt, and pepper, and cook a few more minutes until everything is heated through

For the chipotle- avocado crema:

  1. Put all of the ingredients into a high speed blender and mix until very smooth

To assemble:

  1. Slice the sweet potatoes lengthwise but not all the way through, just so they open up, almost like a butterfly.
  2. Stuff the sweet potatoes generously with the spiced black bean mixture
  3. Top with the avocado crema
Enjoy!!


This will make 4 servings


Saturday, May 9, 2015

GLASS NOODLE SALAD WITH SESAME DRESSING


There is a restaurant in the Cosmopolitan Las Vegas called China Poblano. They offer a fusion of Asian and Mexican food, and it is quite delicious. They do have a vegetarian menu that can easily be adapted to vegan, and one of those dishes is a noodle salad with sesame dressing. I actually crave this salad from time to time as it is so yummy! This week, as I was longing for it, I decided I should give it a go and make my own inspired version.  Obviously it didn't taste exactly the same, but it was really enjoyable.

My baby shower is coming up, and a friend of mine is hosting.  But loving to cook, I still want to prepare some of the dishes.  I think this salad will be perfect to offer as it is light and busting with flavor. Plus it is quick and easy to make... Bonus!!! :) 
I am still working on a little menu for the occasion. I am thinking of using recipes from my blog so that I can share it all with you.  It is coming up in two weeks so I definitely need to get on it soon!


GLASS NOODLE SALAD WITH SESAME DRESSING


Ingredients:

For the salad:

  • 8 oz dried brown rice glass noodles
  • 1 small red onion, cut in half, then sliced very thin into a julienne
  • 1 red pepper, seeded and sliced very thin into a julienne
  • 2 carrots, sliced very thin into a julienne
  • 1 small baby bok choy, sliced very thin into a chiffonade
  • 2 collard green leaves, sliced very thin into a chiffonade
  • 1/4 cup of sesame seeds
  • Sea salt and pepper to taste


For the dressing:

  • 3 tablespoons of sesame oil
  • 3 tablespoons of fresh lime juice
  • 1/3 cup of tamari sauce
  • 1/3 cup of water
  • 1 1/2 tablespoons of rice vinegar
  • 1 1/2 tablespoons of sesame seeds
  • 3 teaspoons of miso
  • 3 dates, pitted and chopped  (if they are hard, soften by soaking them in warm water for 30 minute prior using) 
  • 4 garlic cloves
  • 1 1/2 tablespoons of fresh ginger, chopped
  • Sea salt and pepper to taste


Preparation:


  1. Cook the noodles in hot water following the manufacturer's instructions. 
  2. Once cooked, drain, and let them cool.
  3. Put all of the dressing ingredients in a high speed blender, and blend until very smooth.
  4. Put all of the salad ingredients in a large bowl, add the dressing, and mix well until the noodles are well coated.
  5. Serve into individual bowls.


This will make 4 servings


Friday, May 8, 2015

APPLE, CINNAMON, AND MAPLE GRANOLA~ RAW FOOD STYLE


This is not cereal that you can make and enjoy on the same day. The nuts need to be pre-soaked in order to release the enzyme blockers, and the cereal needs to be dehydrated for 24 hours. But once done, you will have your week's worth of cereal that is super healthy and yummy! The preparation itself does not take a long time, so don't be put off by the wait period. It's well worth it.


I think dehydrated granola cereal taste way better than the oven roasted varieties.  It's also  much healthier because there is no loss of nutrients given that the cereal's ingredients are all still raw. This cereal goes amazingly well with my homemade vanilla cashew milk. (Click: How to make homemade vanilla cashew milk for the recipe), and fresh fruits on top. Definitely a great way to start the day!


These are not super sweet. I like to add fruits on top of my cereal to add sweetness, but if you have a sweet tooth, you can add up to 1/4 cup more of the maple syrup (that should do the trick).  


APPLE, CINNAMON, AND MAPLE GRANOLA~ RAW FOOD STYLE


Ingredients:


  • 2 cups of raw almonds
  • 1 cup of raw sunflower seeds
  • 1/2 cup of gluten free steel cut oatmeal
  • 1/4 cup of chia seeds
  • 2 cups of grated apples (skin on, no core)
  • 1/4 cup of hemp seeds
  • 1/4 to 1/2 cup of maple syrup, depending on how sweet you like (I used 1/4 cup)
  • 1 teaspoon of pure vanilla essence
  • 2 teaspoons of  cinnamon


Preparation:


  1. Soak the almonds, sunflower seeds, oats, and chia seeds in 6 cups of water for 6 hours to overnight
  2. Drain the soaked nuts by placing the mixture into a strainer, and let it drain for a good 5-10 minutes, moving the nuts and seeds around from time to time. Once the water stops leaking, it is ready. It will still look soggy, but that is because the chia seeds have become gelatinous.
  3. Place the drained nuts and seeds mixture in a food processor, and process for a short time.  You just want to mostly break up the large pieces of nuts and mix everything together.  It should have a chunky consistency. 
  4. Place the mixture in a bowl along with all the other ingredients, and mix well
  5. Spread the mixture on a texflex sheet, or on a piece of parchment paper, on top of your dehydrator trays, spreading it sparingly, and leaving some space between pieces so that it looks crumbly.  The chia seeds will get everything to hold together. Do not make it too thick as it will take too long to dehydrate. You will need to use a few trays of your dehydrator.
  6. Dehydrate at 115 F for 24 hours, turning and breaking the mixture apart after 12-15 hours.
  7. The granola cereal should be fully dried after 24 hours.  If they aren't, dehydrate longer (this would be due to spreading the mixture too thick)
  8. Store in large mason jars, do not refrigerate.


Enjoy with fruits and your favorite dairy free 
milk, as a topping, or as a snack on its own!

This will make 8 cups


Thursday, May 7, 2015

VELVETY CREAM OF CAULIFLOWER SOUP


I am not always a big fan of cauliflower. Depending on how it's cooked, I will either love or hate the dish.  Since it's extremely healthy, I do make an effort to eat it periodically.  I like it roasted, raw, and in soups. Not so much steamed.  When cooking cauliflower, I try to get creative in ways that will bring out the flavors that I do enjoy.

Cauliflower is full of antioxidants, vitamins, minerals, and nutrients. It's good for the brain, it helps detoxify, it's an anti-inflammatory, great for the heart, and helps fight cancer. To me, these health benefits certainly justify  adding it to my regular diet.

In this soup, I decided to blend it with potatoes to give it a really creamy, luscious texture once blended. I also added some nutritional yeast, which is a great source of B-12 for vegans, and also brings a cheesy flavor to the dish. It turned out really good. Yay for cauliflower! 


VELVETY CREAM OF CAULIFLOWER SOUP


Ingredients:


  • 1 tablespoon of olive oil
  • 1 onion, chopped
  • 1 garlic clove
  • 2 celery stalks, chopped
  • 2 medium golden potatoes, cubed ~ 2 cups (I kept the skin for extra nutrients)
  • 1 head of cauliflower, cut into florets
  • 6 cups of vegetable broth
  • 1/4 cup of nutritional yeast
  • 2 teaspoons of herbes de provence
  • Sea salt and pepper to taste


Preparation:

  1. In a large saucepan, heat up the olive oil under medium heat.
  2. Add the onion and garlic and cook for 3-4 minutes until translucent
  3. Add all the other ingredients, and bring to boil under medium-high heat
  4. Once boiling, reduce the heat, cover and simmer for 20-25 minutes until the potatoes are tender
  5. In batches, puree the soup in a blender until smooth. 
  6. Serve warm

Bon appetit!

This will make 6 servings