Sunday, July 19, 2015

CURRIED TEMPEH SALAD IN LETTUCE CUP


Tempeh is a fermented soy product, and the fact that it is fermented means that it promotes the good bacteria (probiotics) that our bodies need.  It aids with digestion, weight loss, is high in both fiber and amino acids, and it is also a great source of protein. It has a nutty flavor and a slight crunch to it.  I personally love tempeh, not just for the health benefits, but also because of its versatility.

This was super easy to make. So if you are looking for something healthy, fast, and yummy, look no more! The tempeh salad could be used on its own, in a sandwich, or on top of a green salad. I prefer the lettuce cups because they are light, but there are definitely many ways to serve this delicious tempeh mixture.


CURRIED TEMPEH SALAD IN LETTUCE CUP


Ingredients:
  

For the salad:


  • 1- 8oz package of  tempeh (preferably organic to avoid GMO's), cut into 1/2 inch cubes
  • 1/4 cup of red onions, chopped
  • 2 celery stalks, chopped
  • 1 large carrot, grated
  • 1/2 yellow, red, or orange pepper, chopped
  • 2 tablespoons of coconut flakes
  • 1 mango, skin removed, pitted and sliced thin
  • 1 avocado, skin removed, pitted and sliced thin
  • 1/2 cup of broccoli sprouts (any sprouts would work)
  • 8 lettuce leaves (butter lettuce works great)
  • Sea salt and pepper to taste

For the curried mayo:


  • 1/2 cup of vegan mayo
  • 1 tablespoon of coconut oil
  • 1/2 tablespoon of mango chutney
  • 1 1/2 teaspoons of curry powder
  • 1/2 teaspoon of cumin powder
  • 1/4 teaspoon of dry ginger
  • Sea salt and pepper to taste


Preparation:


  1. In a steam basket over boiling water, place the tempeh cubes, and steam for 8-10 minutes. 
  2. Remove from the heat, and let it cool.
  3. In a medium sized bowl, put the chopped onions, celery, carrot, pepper, and coconut flakes.
  4. Crumble the tempeh and add it to the mixture.  Mix well.
  5. Season with salt and pepper.
  6. In a separate small bowl, mix together with a spoon, all of the mayo ingredients.
  7. Add the mayo to the salad, and mix until all the veggies and tempeh are covered.
  8. Place the lettuce leaves on a plate, and split the tempeh salad evenly over the lettuce cups.
  9. Garnish each lettuce cup with mango slices, avocado slices, and broccoli sprouts. 

Serve as a pretty appetizer.


This will make 8 lettuce cups (4 servings)


Friday, July 17, 2015

AFRICAN PEANUT STEW


I did mention previously that I like peanut butter on pretty much anything, and this stew is no exception.  If you have never tried an African stew, you are in for a real treat.  Filled with veggies, beans, red lentils, and a thick spicy peanut sauce, this will surely leave you both satisfied, and craving for more.

A popular way to serve this type of stew is over couscous, quinoa, or rice.  But mind you, it can be eaten on its own because it is quite nutritious and filling.  The stew will look very "soupy" at first.  However do not fear, because it will thicken as it cooks with the help of the brown rice flour, the red lentils, and the starch from the vegetables.


AFRICAN PEANUT STEW


Ingredients:

For the stew:


  • 1 tablespoon of coconut oil
  • 1 onion, chopped
  • 1 inch ginger piece, skin removed, and chopped finely
  • 3 garlic cloves, chopped
  • 2 cups of green beans, chopped into 1 inch pieces
  • 2 cups kabocha squash, seeded, skin removed, and cut into 1/2 -3/4 inch cubes
  • 2 carrots, sliced
  • 2 cups of potatoes, skin removed, and cut into 1/2- 3/4 inch cubes
  • 2 medium tomatoes, chopped
  • 3 cups of cooked white cannellini beans (about 1 1/3 dried, click here to learn how to cook beans)
  • 1/2 cup of dried red lentils
  • 1 tablespoon of brown rice flour
  • Sea salt and pepper to taste


For the sauce:


  • 4 cups of veggie broth
  • 1/3 cup of smooth, natural, unsalted peanut butter
  • 1 tomato 
  • 2 teaspoons of cumin powder
  • 2 teaspoons of curry powder
  • 1/2 teaspoon of crushed red peppers (optional-spicy)
  • 1/4 teaspoon of cinnamon powder
  • Sea salt and pepper to taste


 For the topping:


  • 1/3 cup of non salted roasted peanuts, chopped
  • 1/3 cup of cilantro, chopped


Preparation:


  1. In a high speed blender, mix all of the sauce ingredients together until smooth. Reserve.
  2. In a large pot, heat up the coconut oil under medium-high heat.
  3. Add the onion, ginger, and garlic, and cook 3-4 minutes until translucent.
  4. Add the green beans, the squash, the carrots, the potatoes, and the tomatoes and continue cooking for 3-4 minutes.
  5. Add the beans, the red lentils, and the rice flour.  Mix well. 
  6. Add salt and pepper to taste.
  7. Add the sauce, bring to a boil, then reduce the heat, and let everything simmer for 25-30 minutes under medium low, half covered.  Do this until the sauce has thickened and the vegetables are tender.  Mix a few times during cooking so that the lentils do not stick to the bottom of your pan. 
  8. Serve warm, on it's own or over couscous, quinoa, or rice.  Sprinkle each plate with some chopped roasted peanuts and/or fresh cilantro.


Enjoy!

This will make 4 servings


Tuesday, July 14, 2015

STRAWBERRIES STUFFED WITH CHOCOLATE MOUSSE


Everyone loves chocolate and strawberries, and this creation will be no exception. Both sweet and refreshing at the same time, this dessert is sure to win some praise. The best part: it is made with wholesome, unprocessed ingredients. There's even avocados in it.  But if you don't tell, no one will know, I promise!

The farmer's market has been filled with merchants selling strawberries lately. They are big, very red, and so juicy. It makes such a difference to buy them fresh, organic, and in season!
They are rich in anti-oxidants, fibers, and nutrients.  They also offer  many health benefits such as: lowering high blood pressure, maintaining a healthy heart, slowing down skin aging, helping with weight loss (even though they taste sweet, they are pretty low in calories!), and boosting of the immune system. So many good reasons to indulge! They are definitely among my favorite fruits!
Don't be afraid to indulge, this dessert is good for you!


STRAWBERRIES STUFFED WITH CHOCOLATE MOUSSE


Ingredients:

  • 2 small ripe avocados, pitted and skin removed
  • 1/2 cup of raw unsalted cashews (preferably soaked for 2 hours in water to release the enzyme blockers, then rinsed)
  • 2/3 cup of non-dairy milk (I used my homemade vanilla cashew milk but any non-dairy milk will work)
  • 1/3 cup of raw cacao powder
  • 1/4 cup of maple syrup
  • 1/2 teaspoon of sea salt
  • 20-25 large strawberries (the quantity will depend on the size of your strawberries)

Preparation:

  1. In a high speed blender, put the avocados, the cashews, the non-dairy milk, the cacao powder, the maple syrup, and the salt together, and mix until very smooth. This will be your chocolate mousse.
  2. Cut off the top of the stems of the strawberries, and a little bit of the base so they can stand. 
  3. Using a small paring knife or a small spoon, hollow out the inside of the strawberries, and set aside.
  4. Put the chocolate mousse in a piping bag.  Fill the strawberries with the chocolate mousse mixture. Serve immediately, or keep refrigerated until ready to serve.


Bon appetit!


This will make 20-25 stuffed strawberries (4 servings)


Saturday, July 11, 2015

TOMATOES STUFFED WITH QUINOA ALLA PUTTANESCA


Italy seems like such a great place to visit. Among the reasons are: the architecture, the food, the wine, the people, and the history.  It is definitely somewhere I am planning on going in the next few years.

Italian food has always hit the spot.  It's both so satisfying and flavorful. The Italian's have a reputation for being a passionate bunch, and you can taste their passion through their food!
Just talk to someone from Italy for a few minutes and you will be taken to a world of vivacious stories, love for life, and an animated conversation about just about everything that they believe in.  

As much as I love Italian food, a lot of it is on the heavy side, high in carbs, or smothered in rich sauces.  It is certainly not the healthiest of cuisines. Here I decided to make a lighter, and healthier version of a popular dish; Pasta Alla Puttanesca.  Let me introduce you to Quinoa Alla Puttanesca instead... voila!  We are now having a quality dish, both high in complex carbs, and protein. Yum :)
Stuffing them in tomatoes makes them very pretty to serve, but that step can be avoided if you are pressed for time and just want a quick meal.


TOMATOES STUFFED WITH QUINOA ALLA PUTTANESCA

Ingredients:


  • 8 tomatoes
  • 1 cup of dried quinoa, rinsed

For the puttanesca sauce:


  • 1 tablespoon olive oil
  • 1 onion, chopped
  • 3 garlic cloves, chopped
  • 10 mushrooms, sliced
  • 1 cup of white beans cooked (about 1/3 cup dried, click how to cook beans to learn how to cook them)
  • 3 large tomatoes, peeled and chopped
  • 1/3 cup black olives, pitted and sliced
  • 1/3 cup of pine nuts
  • 1/3 cup of white wine
  • 1 tablespoon of Bragg liquid amino
  • 1 tsp of dried oregano
  • 1/2 tsp of dried basil
  • 1/4 cup of dried rosemary
  • 1/2 teaspoon of crushed red peppers (optional, spicy)
  • Sea salt and pepper to taste


Preparation:

For the quinoa:


  1. In a small sauce pan, bring the quinoa and 2 cups of water to a boil.
  2. Reduce the heat and simmer for 20 minutes.
  3. Turn off the heat, put the lid on, and let it stand for 5 minutes, fluff with a fork before using


For the tomatoes:


  1. Remove the top, and hollow out the inside of the tomatoes. Reserve


For the sauce:


  1. In a large pan, heat up the olive oil under medium-high heat and add the onions.  Cook 3-4 minutes until they are translucent.
  2. Add the mushrooms and garlic, cook another 5 minutes.
  3. Add the rest of the sauce ingredients, cook another 10 minutes.


To assemble:


  1. Preheat the oven to 375 F
  2. Add the cooked quinoa to the sauce, mix well.
  3. Evenly divide inside the hollowed tomatoes to stuff them.,
  4. Place the stuffed tomatoes on a baking sheet, covered with foil or parchment paper, and bake 15 minutes.
  5. Serve warm


Enjoy!


This will make 4 servings (8 stuffed tomatoes)

Thursday, July 9, 2015

BLUEBERRY OAT PANCAKES


Even though I love pancakes, I don't eat them too often as they are more of what I consider a treat. Mostly due to the fact that they are often made with processed flour and loads of refined sugars. These little pancakes are far from being naughty.  Although they tasted like they were, they actually are more like eating a bowl of oatmeal in pancake form. Much healthier and very delicious! 

Another good thing about these pancakes is that if you are stressed for time in the morning, you can make them the night before, store them in the refrigerator, and reheat them lightly in the toaster in the morning when you're ready to eat . Because they're made with old fashioned oats instead of flour, they are actually a little more dense, and hold their shape very well once cooked. So don't be afraid to double up the recipe so that you have more stored away!


BLUEBERRY OAT PANCAKES

Ingredients:

  • 1 ripe banana, mashed
  • 1 cup of non-dairy milk (I used my homemade cashew milk but any non-dairy milk will do)
  • 2 cups of old fashioned oats (gluten free if avoiding gluten)
  • 1 teaspoon of baking powder
  • 1/2 teaspoon of cinnamon
  • 1 1/2 tablespoons of aquafaba* or 1 flax egg**
  • 2 tablespoons of maple syrup
  • 1 cup of blueberries
  • 1/3 cup of walnuts


Preparation:

  1. Put the old fashioned oats in a blender, and blend until you get a flour consistency.
  2. In a medium bowl, put all of the ingredients together, and mix well until you get a nice batter (can be done with a spoon).
  3. Let it stand 15 minutes to set slightly.
  4. In a frying pan, heat up a little bit of oil (I used coconut oil) under medium heat.
  5. Add about 2 tablespoons of the batter. Since it is a denser batter, you will need to shape the pancake (you can use a spoon to do so).  They should be about 3 inches in width, and about 1/2 inch in thickness. If you make them bigger than that, they might not cook properly in the center.
  6. Cook 2-3 minutes, carefully turn the pancakes over, and cook another 2-3 minutes on the other side.
  7. You will need to make a few batches as they will not all fit in the pan. 
  8. Serve with toppings of your liking.  Some popular ones are: maple syrup, fruits, jam, coconut whipped cream, or chocolate syrup.


Enjoy!


This will make 8-10 small pancakes ( 4 servings)


*Aquafaba is the liquid you get when cooking chickpeas or any white beans, You can use the liquid from a can of chickpeas, or fresh homemade ones. It works as an egg replacement.

** To make a flax egg: use 1 tablespoon of flax seeds, grind it in a coffee grinder, and then mix it with 3 tablespoons of water, Let it stand a few minutes to thicken. This will also work as an egg replacement.


Tuesday, July 7, 2015

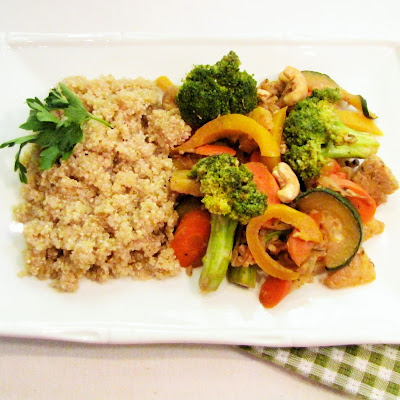
SWEET AND SOUR VEGETABLES WITH TEMPEH


Eat your veggies they say...
Well, there is a reason why: veggies are filled with nutrients and vitamins, and each color offers different benefits.  They are also known to improve heart health, boost the immune system, help digestion, and can help prevent cancer.

But I get it, eating veggies on their own can be a little boring.  My favorite way to get my veggies is through juicing.  You can pack so much in a glass, and it's really practical (and yummy!).  But I find that in some recipes, with the right seasoning or sauce, veggies really shine as well.

This stir-fry is a great way to get a nice variety of veggies in your system.  It is simple to make, nutritious, and delicious. No more excuses!


SWEET AND SOUR VEGETABLES WITH TEMPEH

Ingredients:

For the stir-fry:


  • 2 tablespoons of coconut oil
  • 8 oz package of tempeh, cut into 1/2 inch cubes
  • 1 onion, slice thin
  • 3 cloves garlic
  • 2 carrots, sliced
  • 1 small zucchini, cut in half lengthwise, and sliced
  • 2 cups of broccoli florets
  • 1 yellow, red, or orange pepper, seeded and sliced
  • 1 cup of pineapple, skin removed, and cubed
  • 1/3 cup of cashews
  • Sea salt and pepper to taste


For the sauce:


  • 3 tablespoons of tamari sauce
  • 3 tablespoons of agave
  • 2 tablespoons of water
  • 1 1/2 tablespoons of rice vinegar
  • 1 tablespoon lemon juice
  • 1/4- 1/2 teaspoon of sambal oelek (optional, spicy)
  • Sea salt and pepper to taste


Preparation:


  1. Whisk all of the sauce ingredients together in a small bowl, reserve.
  2. In a wok or large saute pan, heat up 1 tablespoon of the coconut oil under medium-high heat, and add the tempeh cubes. Saute for a few minutes, turning them a few times, until they are light brown on each side.
  3. Remove the tempeh from the pan and reserve.
  4. Quickly wipe the pan clean and heat up the other tablespoon of coconut oil, under medium- high heat. Add the onions and garlic, and saute 2-3 minutes, until they are slightly translucent.
  5. Add the carrots, zucchini, broccoli florets, and pepper slices. Saute 6-8 minutes until the broccoli is bright green, and the veggies have slightly softened.
  6. Add the pineapple, the cashews, the reserved tempeh, and the sauce. Cook another 2-3 minutes, mixing well, until the sauce is slightly thickened, and all the vegetables are coated.
  7. Season with salt and pepper to taste
  8. Serve with quinoa or rice.


Enjoy!


This will make 4 servings


Saturday, July 4, 2015

BANANA PUDDING WITH 4TH OF JULY TOPPINGS


Happy Fourth of July!
Also known as Independence Day, this federal holiday celebrates the adoption of the Declaration of Independence from Great Britain on July 4th 1976.  It is one of the most celebrated holidays in America. BBQs, picnics, parades, fireworks, and gatherings are the most common ways to rejoice on this occasion. I jokingly like to call this day, "the day that my dogs thinks the world is ending!"  as my poor babies gets really scared from all the fireworks.  But it's all good, they have survived it every year, and I'm sure this year will be no exception!

There are so many recipes that I can think of that would be great for the Fourth of July. Some fun appetizers (try my Stuffed mini sweet peppers with veggies and lemon dill cashew cream cheese filling), veggie burgers for the grill (try my Southwestern black rice and red  bean burgers), delicious salads (try my Summer corn salad with chimichurri dressing), refreshing cold soups (try my Gazpacho soup), or a colorful dessert like this recipe that I am about to share with you; my famous banana pudding with 4th of July toppings. I made this dessert in the past, and it was such a hit!  Plus it's healthy and easy to make, but that can be our secret!  ;)


BANANA PUDDING WITH 4TH OF JULY TOPPINGS 

Ingredients:

For the pudding:

8 bananas
6 dates, pitted (if they are hard, soften them by soaking them in hot water for 30 minutes)
1/2 cup of raw cashews 
2 tablespoons of coconut oil
1 tablespoon of pure vanilla essence
1 tablespoon of lemon juice


For the toppings:

1 cup of coconut flakes 
1/2 cup of blueberries
1 cup of strawberries, chopped

Preparation:

In a high speed blender, put all of the pudding ingredients together, and blend until very smooth.
Transfer to 6 small rectangular individual bowls and leave in the refrigerator to set for 1 hour.
Place the toppings to make a USA flag (see pictures) on top of each puddings and serve.

Enjoy!


This will make 6 puddings

Thursday, July 2, 2015

BROWN RICE PRIMAVERA WITH ARUGULA AND ALMOND PESTO


I personally try to avoid white rice.   I eat it on occasion, and it's practical as it cooks faster, but there is a reason why that's the case (and it's not a great one). See white rice would be brown if they did not remove the side hulls and bran. They are full of protein, thiamine, calcium, fiber, magnesium, and potassium. They do add to the cooking time, but their benefits are way worth the extra mile!  Most manufacturers will add back those vitamins and iron in a synthetic form to white rice  and label it as "enriched" or "nutritious".  But at the end of the day, I think we can all agree that all things equal, its best to get the natural form of vitamins and nutrients, as opposed to the man made synthetic ones.  Brown rice also has a much nuttier texture and flavor, which I absolutely love. 

This recipe calls for a few nice summer veggies, so it is full of nutrients. The pesto, made with arugula and almonds instead of basil and pine nuts, was a nice touch as it brought the flavors to a whole new level. I seriously wish I made a double batch, as this was gone in no time, and I am now craving some more!  This can be enjoyed warm or cold, so you can make it ahead of time and pack it for lunch as well. 


BROWN RICE PRIMAVERA WITH ARUGULA AND ALMOND PESTO


Ingredients:

For the rice:

  • 1 1/2 cups of dry short grain brown rice
  • 3 cups of vegetable broth 
  • 1 tablespoon of olive oil
  • 1 small onion, chopped
  • 2 garlic cloves, chopped
  • 1 cup of zucchini, grated
  • 1 cup of carrots, grated
  • 1 1/ 2 cups of broccoli florets, cut small
  • 3/4 cup of frozen peas, thawed
  • 1 cup of spinach
  • Salt and pepper to taste


For the pesto:

  • 2 cups arugula
  • 1/2 cup of raw almonds 
  • 1/4 cup of fresh lemon juice
  • 1/4 cup of avocado oil (can substitute with olive oil if you do not have)
  • 2 garlic cloves, chopped
  • 1/4 cup of nutritional yeast
  • Sea salt and pepper to taste


Preparation:

  1. In a small sauce pan, bring the vegetable broth to boil, and add the rice.
  2. Reduce the heat to low, cover and let simmer for 45 minutes.*
  3. Once the broth is mostly absorbed, remove from the heat, and let the rice strand for another 10 minutes, covered.
  4. In the meantime, put all of the pesto ingredients in a food processor and process until smooth. Reserve.
  5. In a large saute pan, heat up the olive oil under medium heat, and cook the onions and garlic for 4-5 minutes until translucent,
  6. Add the rest of the vegetables and cook another 7-10 minutes until the vegetables are tender.
  7. Add the rice and the pesto, mix well, and adjust the seasoning.
  8. Serve warm, or put in the refrigerator for later use if you want to eat it cold.

Enjoy!


This will make 4 servings


*If using a different kind of rice, your cooking time will vary, so please verify with the manufacturer's instructions to be safe.


Wednesday, July 1, 2015

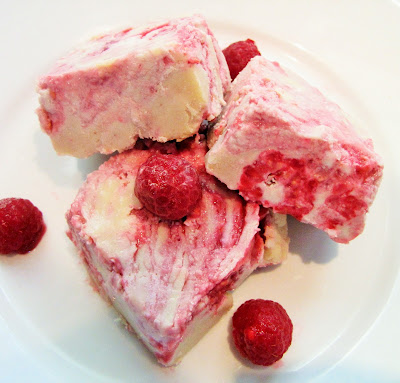
WHITE CHOCOLATE AND RASPBERRY FREEZER FUDGE


Happy Canada day!

Since the Canadian flag is red and white, I decided to go with a decadent dessert to show off these two colors.  This recipe for freezer fudge is nothing like the fudge I grew up with, which was made with processed ingredients, and also high in refined sugars.  These are made with real, whole food ingredients that actually nourish your body.  They also happen to be very satisfying. Since they are kept in the freezer, you can definitely save them for a longer period of time, and enjoy them when you really have a sweet tooth craving.

Now keep in mind that although this fudge is healthier than the ones you will find in most stores, it is still quite high in fat and calories.  So indulge knowing that it is made of whole ingredients, but do not go overboard with them... especially if you are trying to lose weight! They are what I like to call a decadent treat. Which are great to have from time to time.


WHITE CHOCOLATE AND RASPBERRY FREEZER  FUDGE


Ingredients:

For the fudge:

  • 2 cups of raw unsalted cashews
  • 2 cups of raw cacao butter, melted
  • 1 cup agave nectar
  • 1/2 cup of coconut oil
  • 1/2 cup of water
pure raw cacao butter


For the raspberry coulis:

  • 1 1/2 cups of raspberries
  • 1/3 cup of agave


Preparation:


  1. In a high speed blender, put all of the fudge ingredients together, and blend until very smooth.
  2. Line a pan with plastic wrap or parchment paper (I forgot to do that step and had a really hard time getting the fudge out of the pan). 
  3. Top the lined pan with the fudge batter.
  4. In a clean blender, mix the raspberry coulis ingredients together until smooth.
  5. Drop spoon fulls of the raspberry coulis on top of the fudge, and use a knife or a fork to swirl it together.  The trick is is to not mix it fully. Take your time and add more of the coulis as you go.
  6. Place in the freezer, and let it set for a few hours to overnight. The time will depend on the size of your pan ( I used a 8 X 6 pan and it took about 5 hours to set. It also made a very high fudge. I think  a 9 X 9 pan would have been better). 
  7. Once set, remove from the freezer, and cut into small squares, to the size of your liking.
  8. Store any left overs in the freezer.
Enjoy!